- Offer
- Offer
- System types
- KAN-therm ultraPRESS System
- KAN-therm Steel System
- KAN-therm Inox System
- KAN-therm Steel Sprinkler System
- KAN-therm Inox Sprinkler System
- KAN-therm Tacker System
- KAN-therm Profil System
- KAN-therm Rail System
- KAN-therm TBS System
- KAN-therm WALL System - the wet method New!!!
- KAN-therm WALL System - the dry method New!!!
- KAN-therm Football System
- KAN-therm InoxFlow manifolds
- KAN-therm Cabinets Slim & Slim+
- Installation types
- Calculators
- KAN-therm SMART & BASIC+ Automation Systems
- New products on offer
- Download
- Kvalitetsgaranti
- Reference objects
- Om oss
- Contact


Connecting technology
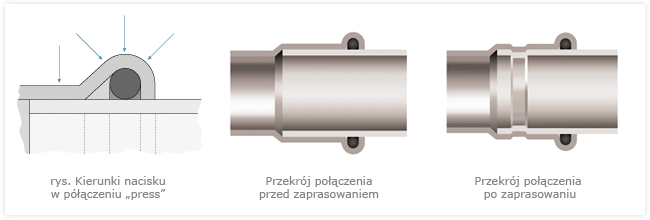
The KAN-therm Inox and Steel System bases on the technology of the press-on system „ultraPRESS” and an „M” profile of clamping. This provides:
- 3-plane pressure on an O-ring ensuring its right deformation and adherence to the pipe surface,
- full closure of the O-ring groove space thru pressing the fitting edge to the pipe surface, which prevents intrusion of dirt into this fitting and is a natural protection of the seal and reinforces a connection mechanically,
- control of the condition of a sealing, i.e. the shape of the O-ring groove next to the fitting edge.
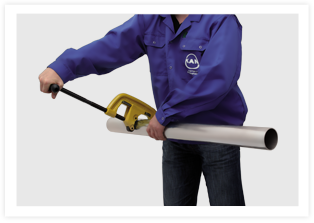
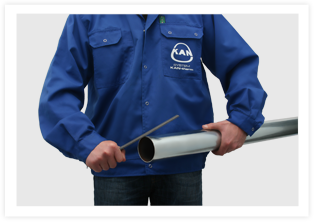
1. Cut pipes with a disc cutter at the right angle to the axis. Other tools like hand and electric saws for cutting carbon steel are allowed, provided a cut is at the right angle and cut edges will not be damaged. Breaking off only partly cut pipe sections is not allowed. Do not use burners and cutting discs for cutting. When determining the length to be cut off remember the depth to which a pipe must enter into a fitting.
2. Using a hand or electric chamfering tool (for larger diameters a half-round file for steel) chamfer the external and internal edge of a cut pipe and remove all the burrs, which can damage the O-ring during assembly. Remove also any filings on and in a pipe, which can increase the risk of point corrosion.
3. In order to achieve the right strength of a connection a pipe must enter a fitting to a proper depth. Mark that required depth on a pipe (or fitting with a „bare“ end) with a felt-tip pen. After pressing the mark on the pipe must be visible just at the fitting edge.

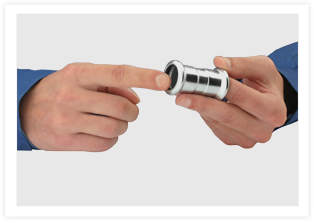
4. Prior to assembly check visually if the O-ring is in its seat and its condition is OK. Make sure also there are no filings or other foreign matter in a pipe and fitting, which can damage the seal, when a pipe is pushed in. If so, remove them. Make sure whether the distance between the neighbouring fittings is not smaller than allowed.
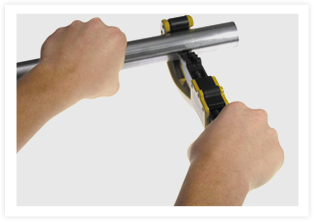
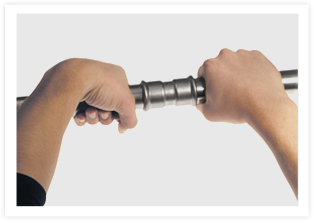
5. Before the pressing insert a pipe axially into a fitting to a marked depth (as light rotation for easy movement is allowed). Do not use oil, grease or fat for easy pushing into a pipe (water, or soap solution are permitted – recommended for the pressure test with compressed air). In case of simultaneous assembly of several connections (by inserting pipes into fittings), prior to pressing every successive connection, check the insertion depth marked on every pipe.
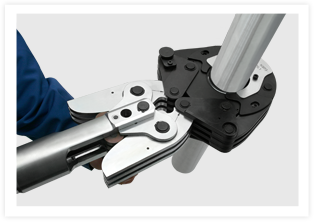
6. Before you start pressing check the technical condition of tools. It is recommended to use clamping tools and pressing jaws delivered by the KAN-therm System. Always select a proper size of the pressing jaws according to a connection you are making.
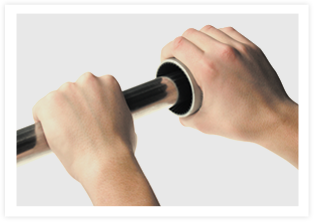
The pressing jaw shall be fitted on a connector so that the profile in it embraces exactly the groove, where the O-ring is seated in a connector (the convex part of a connector). After starting the clamping tool the process of pressing is performed automatically and cannot be stopped.
If for any reason the pressing is interrupted a connection shall be dismantled (cut out) and made again.
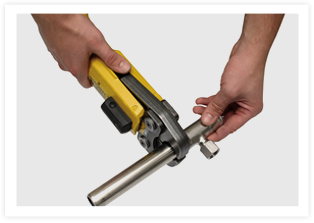
6.1. For pressing the three largest diameters (64; 76,1; 88,9; 108) use special four-fold jaws and a clamping tool by Klauke or Novopress. Take out the jaws from its case and unlock them by pulling out a special pin and open them.

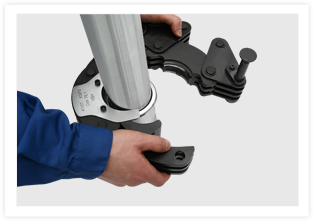
6.2. Fit the opened jaws onto a fitting. The jaws are provided with a special groove into which you must fit the fitting flange. Notice: The plate with the printed size of the jaws (see drawing) shall be always on the side of a pipe.
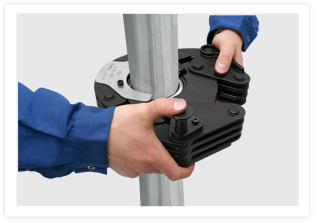
6.3. With the jaws properly seated on a fitting lock the jaws again by pushing the pin as far as possible; now the jaws are ready to connect to it the clamping tool.
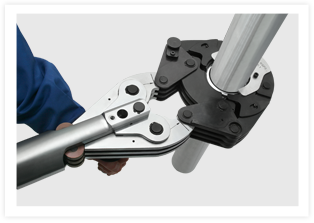
6.4. The clamping tool shall connected to the jaws as shown in the drawing. Absolutely see to it the arms of the tool are inserted to the end into special holes in the jaws. The points of the maximum insertion are marked on the arms of the device. With the clamping tool so connected it can be started to fully clamp together a connection.
6.5. After starting the clamping tool the process of pressing is performed automatically and cannot be stopped. If for any reason the pressing is interrupted, a connection shall be dismantled (cut out) and made again correctly. With the pressing step completed the clamping tool retracts automatically to its original position. Then, pull out the clamping tool arms from the jaws. To take the jaws off a fitting unlock it again by pulling out the pin and open it. Keep the jaws in its case, securely locked.